

Why Utah Businesses Need Local Shopify Development
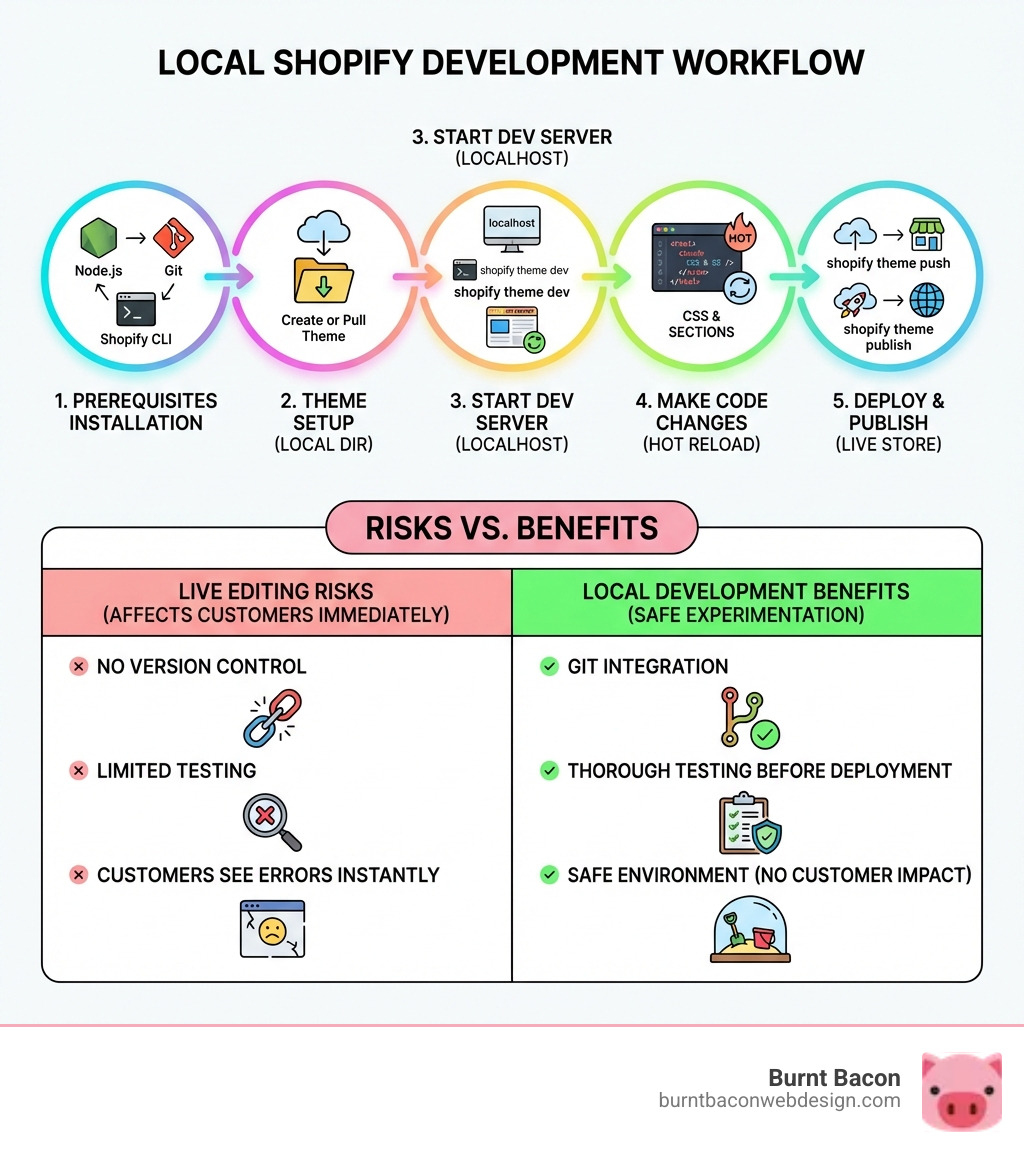
For any Utah business running on Shopify, from a boutique in Salt Lake City to a growing brand in South Jordan, local Shopify development is the professional standard for creating a unique and stable online store. It’s the process of building and customizing your theme on a local computer before any changes go live. Here’s what that means for your business:
- What it is: A secure workspace where our developers modify your Shopify theme code locally using tools like Shopify CLI
- Why it matters for Utah’s market: Test changes safely without affecting your live store, see updates instantly, and collaborate using version control to stay ahead of the competition
- What you need: Node.js, Git, Shopify CLI, and a Shopify Partner account with a development store
- How it works: Pull your theme locally with
shopify theme pull, make changes, preview withshopify theme dev, then push updates withshopify theme push
Local development is unique in the Shopify world. Unlike traditional web development, Shopify’s Liquid templating language still relies on Shopify’s servers for rendering. Your local setup compiles JavaScript and CSS for fast previews, but Liquid templates are processed by Shopify’s infrastructure. This hybrid approach gives you the speed and safety of local development for assets, while Liquid rendering stays accurate and up-to-date with Shopify’s latest features.
For Utah businesses building custom online stores, this workflow is crucial. It prevents costly mistakes like accidentally breaking your live theme during business hours or losing customizations made through Shopify’s Theme Editor. You can experiment freely, test thoroughly, and only push changes when you’re confident they work.
I’m Craig Flickinger, founder of Burnt Bacon Web Design, and I’ve spent over 10 years helping Utah businesses optimize their web presence and tackle complex development challenges like Local Shopify development. This guide will walk you through setting up your environment, mastering the Shopify CLI, and building custom themes with confidence.
Why Go Local? Understanding the Power of Offline Shopify Development

For our clients across Salt Lake City and South Jordan, local Shopify development means creating a secure, private workshop for their online store right on our computers. This approach is distinct because, as we touched on, the core templating language, Shopify Liquid, isn’t fully rendered locally. Instead, our local environment handles the JavaScript and CSS compilation, while Shopify’s servers take care of the Liquid rendering. This unique hybrid model offers a fantastic blend of control and efficiency for businesses throughout Utah.
So, why can’t Shopify Liquid be fully rendered locally? It boils down to its very nature. Liquid is a templating language created by Shopify and written in Ruby. It’s now available as an open source project on GitHub and forms the backbone of all Shopify themes, loading dynamic content to online stores. Shopify Themes use an extended version of Liquid with a variety of additional objects, tags, and filters. These extensions allow Liquid to access and manipulate a huge amount of store data, including products, customer carts, and Theme Editor settings. Because Liquid is so tightly coupled with Shopify’s databases and servers, it’s not practical to package it for entirely local rendering. Doing so would require constantly duplicating Shopify’s complex server-side logic and database access, which would be a massive undertaking for every local setup. It’s much more reliable and efficient to let Shopify’s infrastructure handle it, ensuring accurate previews and compatibility with the latest features.
The benefits of this local development environment are immense, especially for our Utah clients. A local development environment acts as a secure workspace for developers to fine-tune their Shopify themes without the worry of affecting the live store. This minimizes risks and errors by providing a controlled setting for experimentation, effectively reducing the possibility of introducing bugs directly into your live online store. Imagine making a small change to your theme’s announcement bar. In a live environment, one wrong character could break the entire site for your customers. Locally, you can tweak, test, and perfect it before it ever sees the light of day on your live store.
This controlled environment also empowers us to customize themes with greater flexibility and precision. We can experiment with new design elements and functionalities, knowing that our live site remains unaffected. This precision in testing design elements and functionalities allows for truly unique and high-performing online stores, which is vital for businesses looking to stand out in Utah’s competitive e-commerce landscape. By keeping development separate, we protect your brand’s online reputation and ensure a seamless shopping experience for your customers.
Your Pre-Flight Checklist: Tools and Accounts You’ll Need
Before our developers in Salt Lake City and South Jordan begin any custom theme work, we ensure our local development environment is perfectly configured. Think of it as a pre-flight check; for professional local Shopify development that serves Utah businesses, having the right tools isn’t just a suggestion—it’s a requirement.
Here’s what you’ll need:
-
Shopify Partner Account and Development Store: This is your gateway to the Shopify ecosystem. If you want to work on a theme, you’ll need to create or log in to a Shopify Partner account. We recommend creating a development store if you don’t already have one. This provides a free, isolated environment for testing without impacting a live merchant store. If you’re working on an already set up store, ensure you have a collaborator account or staff account with “Manage themes” or “Themes” permission, or you are the store owner. Creating a Partner Account at partners.shopify.com/signup using a company email (not a personal one) is a best practice, as it improves team collaboration and access rights for Utah-based agencies and their clients. Don’t forget to set up two-factor authentication immediately for robust security!
-
Node.js: This JavaScript runtime is crucial for the Shopify CLI to function. Node.js version 16.20.0 or later is mandatory for Shopify CLI 3.x. You can download it from the official Node.js website.
-
Git: Essential for version control, Git allows us to track changes, revert to previous versions, and collaborate effectively. You can Install Git from its official website.
-
Shopify CLI: This is Shopify’s powerful command-line interface tool that simplifies theme and app development. It’s Shopify’s newest tool for building themes and apps, and Shopify recommends using it for Online Store 2.0 theme development. Ensure you have Shopify CLI installed on your system along with everything mentioned in the Shopify CLI documentation. We install it globally via npm using
npm install -g @shopify/cli @shopify/theme. -
Code Editor (e.g., VS Code): While not strictly a prerequisite, a robust code editor significantly improves the development experience. VS Code holds over 73% market share among JS developers (Stack Overflow Developer Survey 2024), and its Shopify Liquid Prettier extension simplifies template adjustments, making it a popular choice among our team and many developers in Salt Lake City and beyond.
Here’s a quick summary of the required software:
- Node.js: Version 16.20.0 or later
- Git: Latest stable version
- Shopify CLI: Latest version (installed via npm)
- Code Editor: Visual Studio Code (highly recommended)
With these tools installed, a developer’s machine is properly equipped to handle professional Shopify projects for businesses anywhere in Utah.
A Step-by-Step Guide to Local Shopify Development with CLI
With the toolkit ready, it’s time to get practical with the Shopify CLI. This is the command-line tool our Salt Lake City-based team uses daily to manage local Shopify development for our Utah clients. It allows us to initialize new projects, pull existing themes, run a local development server for instant previews, and safely push changes to a live store.
Initializing a New Project vs. Pulling an Existing Theme
When starting a new theme project or working on an existing one, the first step is to get the theme files onto your local machine. Shopify CLI offers two primary commands for this: shopify theme init and shopify theme pull.
-
shopify theme init: This command is for when you want to start a brand-new theme project from scratch or clone a starter theme. It’s perfect for building something entirely custom. When you runshopify theme init, the CLI will prompt you to name your new theme and will then clone the Skeleton theme by default. The Skeleton theme is a minimal, carefully structured Shopify theme designed to help you quickly get started, built with modularity, maintainability, and Shopify’s best practices in mind. -
shopify theme pull: This is the command we’d use if a South Jordan-based client asked us to update their existing theme. It allows us to download a perfect copy of their store’s theme to work on locally. To use it, you’ll steer to your desired project folder in the terminal and run a command similar to this:shopify theme pull --store=your-store-name.myshopify.comThis will prompt you to log in to your Shopify Partner account and then select the theme you wish to pull from your store.
The key difference between shopify theme init and shopify theme pull is their starting point: init creates a new theme project locally, often based on a starter like Skeleton, while pull downloads an existing theme from a Shopify store. Both are crucial for effective local Shopify development.
Starting the Dev Server for Real-Time Previews
Once you have your theme files locally, the next crucial step is to start a local development server. This is where the magic of real-time previews and hot reloading comes into play, making our lives as developers much easier.
To start your local development server, steer into your theme’s directory in the terminal and run:
shopify theme dev --store=your-store-name.myshopify.com
(Replace your-store-name.myshopify.com with your actual store URL).
This command does several powerful things:
- Connects to Your Store: It establishes a connection to your specified Shopify store.
- Uploads to a Development Theme: It creates a temporary, unpublished development theme on your store and uploads your local code to it. This allows for safe testing without affecting your live theme.
- Starts a Local Server: It starts a local server on your computer, typically accessible via
http://127.0.0.1:9292in your browser. - Enables Hot Reloading: This is a game-changer! As you make changes to your local CSS and JavaScript files, the
shopify theme devcommand automatically detects these modifications and instantly refreshes your browser preview without requiring a manual page reload. For Liquid and section changes, it pushes them to the development theme on Shopify’s servers, and the preview updates. This real-time feedback loop is invaluable for rapid iteration, allowing our developers to fine-tune a theme for a Utah client and see the impact of their code immediately. We can easily check how our Custom Online Store Development efforts are progressing. - Generates Preview Links: You can also use the
devcommand to generate a preview link and a link to the theme editor for the development theme, making it easy to share progress with clients or team members.
The shopify theme dev command is the heart of local Shopify development, offering a dynamic and efficient way to build and test themes.
Pushing and Publishing Your Local Shopify Development Changes
After diligently working on your theme locally, previewing changes, and ensuring everything looks perfect, the final steps are to push your changes to your Shopify store and, eventually, publish the theme to make it live.
-
Pushing Local Theme Changes (
shopify theme push):
When you’re satisfied with your local modifications, you’ll use theshopify theme pushcommand to upload them to your Shopify store.-
For a brand-new theme (first upload): If this is the first time you’re uploading a theme you initialized locally, you’ll use the
--unpublishedflag:shopify theme push --unpublishedThis command creates a new, unpublished theme in your store’s theme library and uploads your local files to it. You’ll be prompted to give the new theme a name.
-
For updating an existing theme: If you’ve pulled a theme, or are updating a theme you’ve previously pushed, simply run:
shopify theme pushThis will update the existing theme on your Shopify store with your local changes.
Shopify CLI is smart about deployment. It will prompt you before deploying to a published theme or overwriting
settings_data.json(which holds Theme Editor customizations). This is a crucial safety net, preventing accidental overwrites of live themes or losing valuable customizations. We always recommend careful consideration of these prompts, especially when dealing with currently published themes. -
-
Publishing Your Theme (
shopify theme publish):
Once your theme is pushed and you’re ready for it to go live on your store, you can publish it. First, ensure all your local changes have been pushed successfully usingshopify theme push. Then, run:shopify theme publishThe CLI will display a list of your unpublished themes and ask you to select the one you want to make live. Confirm your selection, and your beautifully crafted theme will replace your current live theme, becoming visible to all your customers. This process is integral to our Ongoing Shopify Support for our Utah clients, ensuring smooth transitions and updates.
Benefits, Best Practices, and Choosing Your Tools
Leveraging local Shopify development isn’t just about technical convenience; it’s about building a robust, efficient, and collaborative workflow. For Utah businesses, this means better quality online stores, faster updates, and peace of mind.
The Advantages of a Local Workflow
The benefits of developing themes locally are manifold and directly impact the success of our clients in Salt Lake City, South Jordan, and across Utah:
- Risk Mitigation: As we’ve discussed, a local environment acts as a secure sandbox. You can experiment, break things, and fix them without any impact on your live store. This drastically reduces the potential for costly errors that could disrupt customer experience or sales.
- Faster Previews and Iteration: With
shopify theme dev, we get instant feedback through hot reloading for CSS and JavaScript changes. This rapid iteration cycle means we can design and implement features much faster, leading to quicker project completion and more dynamic design processes. - Improved Developer Experience: Developers prefer working in their familiar local setups with powerful code editors like VS Code, integrated version control, and specialized extensions. This comfort and efficiency translate directly into higher quality code and a more enjoyable development process.
- Efficient Collaboration: Local environments, especially when combined with version control systems like Git, enable teams to collaborate seamlessly. Multiple developers can work on different parts of a theme simultaneously, merging their changes without conflict. This is particularly beneficial for larger projects or ongoing maintenance, ensuring that our team can work together effectively to serve your needs.
- Compilation and Serving of Assets: The local development server excels at compiling and serving theme JavaScript and CSS. This means we can use modern development tools and workflows (like Sass preprocessors or advanced JavaScript bundling) that wouldn’t be possible with direct online editing. The compiled assets are then served efficiently, contributing to faster loading times for your customers.
These advantages collectively contribute to the 7 Advantages of Investing in Custom Shopify Development Services, highlighting why a local workflow is not just a luxury, but a necessity for serious Shopify development.
Choosing Your Toolkit: Shopify CLI vs. Theme Kit
Shopify provides two primary command-line tools for theme development: Shopify CLI and Theme Kit. While both serve to facilitate local Shopify development, they have distinct strengths and recommended use cases.
| Feature | Shopify CLI | Shopify Theme Kit |
|---|---|---|
| Primary Use Case | Online Store 2.0 themes, app development, partner authentication, scaffolding | Older (“vintage”) themes, basic theme upload/download |
| Shopify Rec. | Recommended for Online Store 2.0 and modern development | Recommended for vintage themes, or if you prefer its specific workflow |
| OS 2.0 Support | Full support for features like sections everywhere, app blocks, metaobjects | Limited or no specific support for OS 2.0 features beyond basic file transfer |
| Setup/Auth | Partner account authentication, automatic tunneling | API credentials/password required, manual configuration via config.yml |
| Commands | theme init, theme pull, theme dev, theme push, theme publish, theme check |
theme get, theme watch, theme upload, theme download, theme deploy |
| Hot Reloading | Yes, for CSS and sections (shopify theme dev) |
Limited, typically requires full page refresh for most changes |
| Team Dev | Integrated with Partner Dashboard, isolated dev stores for apps | Can be used by teams with shared config.yml or individual credentials |
| Recent Updates | Actively developed with recent improvements | Older tool, less frequent updates, for maintaining existing legacy themes |
Our Recommendation: For any new projects, or for working on Online Store 2.0 themes (which is the standard now), we strongly recommend using Shopify CLI. It’s Shopify’s newest tool for building themes and apps, with improvements released in recent months, and Shopify recommends using it for Online Store 2.0 theme development. Shopify CLI enables automatic tunneling, app scaffolding, and partner authentication, streamlining the entire development process.
Theme Kit, while still functional, is largely considered a legacy tool. The Theme Kit is a cross-platform tool that works for older themes on Windows, Linux, and macOS. If you’re maintaining an older, “vintage” theme that hasn’t been updated to OS 2.0 standards, Theme Kit might be a viable option. However, for modern local Shopify development, Shopify CLI is the clear winner.
Best Practices for Your Local Shopify Development
Adopting a local development workflow is just the first step. To truly excel, especially for our Utah-based clients, we accept several best practices that ensure code quality, collaboration, and stability.
-
Version Control with Git: This is non-negotiable. Always initialize a Git repository for your theme project. This allows you to track every change, revert to previous versions if needed, and manage collaborative efforts. Tools like Husky can configure Git hooks, such as
pre-commit, to enforce linting and code formatting before every commit, ensuring consistent code quality across your team. -
Use
.gitignore: Make sure your.gitignorefile excludes sensitive information (like API keys if you’re using Theme Kit’sconfig.yml) and unnecessary files (likenode_modulesor.DS_Store). This keeps your repository clean and secure. -
Run
shopify theme check: Before pushing your changes, runshopify theme check. This command executes Theme Check, a linter for the Liquid and JSON files in your theme. Theme Check will identify any errors in your theme, such as syntax errors, unused variables, and potential performance issues. It’s like having a vigilant assistant reviewing your code for common mistakes! -
Leverage VS Code Extensions: If you’re using VS Code (which, as we noted, holds over 73% market share among JS developers), install the Shopify Liquid extension. This Liquid extension helps with syntax highlighting, formatting, and autocompletion, significantly speeding up development and reducing errors.
-
Understand Team Permissions and Collaboration: When working in a team, ensure each developer has the appropriate permissions. For merchant stores, a collaborator account or staff account with “Manage themes” permission is essential. For app development, Shopify CLI’s
shopify app devcommand isolates changes to a single dev store, allowing app development teams to safely share a single development instance of an app. This principle of isolated development environments is also beneficial for theme development collaboration.
By integrating these best practices into our local Shopify development workflow, we ensure that the themes we build for Utah businesses are not only visually stunning and functional but also robust, maintainable, and developed with the highest standards.
Frequently Asked Questions about Local Shopify Development
As a Utah-based Shopify development agency, we often field questions from businesses in Salt Lake City, South Jordan, and beyond about how this ‘local development’ process actually works. Here are the answers to the most common questions we hear:
What is Shopify Liquid and why can’t it be rendered locally?
Shopify Liquid is the templating language that powers all Shopify themes. It was created by Shopify and is written in Ruby. While it’s now an open source project, the version used in Shopify themes is an extended version of Liquid that includes special objects, tags, and filters to access vast amounts of store data (like product details, cart contents, and Theme Editor settings).
The reason it can’t be rendered fully locally in a standalone environment is due to this deep integration. Liquid is tightly coupled with Shopify’s backend databases and servers. A reliable, sustainable local renderer would essentially need to replicate Shopify’s entire server-side logic and database access, which is a massive and ever-changing undertaking. Instead, shopify theme dev uses Shopify’s servers for accurate Liquid rendering, ensuring that what you see in your preview is exactly what Shopify will serve to your customers, while still providing the benefits of local asset (CSS, JS) compilation and hot reloading.
What are the main benefits of using a local development environment?
The primary benefits of using a local development environment for Shopify themes can be summarized as safety, speed, and collaboration:
- Safety: You can experiment freely without any risk of affecting your live store. This means no accidental downtime or broken features for your customers in Salt Lake City, South Jordan, or anywhere else. You’re working in a sandbox.
- Speed: The
shopify theme devcommand provides real-time previews and hot reloading for CSS and JavaScript changes. This allows for incredibly fast iteration, letting you see the results of your code modifications instantly, which dramatically speeds up the design and development process. - Collaboration: Local development, when combined with version control systems like Git, makes it easy for teams to work together on the same theme. Developers can work on separate features, track changes, and merge them efficiently, ensuring a streamlined workflow for complex projects.
- Precision: It allows for detailed testing of design elements and functionalities in a controlled setting, leading to higher quality and more refined themes.
How do I start working on an existing theme from my store?
If you’re a Utah business with an existing store and want to start making changes locally, the process is straightforward with the Shopify CLI. After you’ve ensured all your prerequisites (Node.js, Git, Shopify CLI, and a Partner account) are set up, you’ll simply:
- Open your terminal or command prompt.
- Steer to the directory where you want to store your theme files.
-
Run the following command, replacing
your-store-name.myshopify.comwith your actual store’s URL:shopify theme pull --store=your-store-name.myshopify.com -
The CLI will then prompt you to log in to your Shopify Partner account and select the specific theme you wish to pull from your store’s theme library.
Once completed, the theme files will be downloaded to your local machine, ready for you to open in your code editor and begin development with shopify theme dev.
Launch Your Custom Shopify Experience
Local Shopify development empowers Utah businesses to create unique, high-performing online stores that stand out. By following this guide, you can build and test with confidence, ensuring a flawless customer experience. This modern workflow allows for greater flexibility, faster iteration, and a significantly reduced risk of errors impacting your live site, which is essential for thriving in the competitive e-commerce landscape of Salt Lake City, South Jordan, and beyond.
For businesses looking for expert guidance and execution on custom theme projects, Burnt Bacon offers specialized Shopify Development Services. We’re here to help you open up the full potential of your online store and provide dedicated Utah Shopify Development that understands the local market. Let’s build something amazing for your brand!